Kai's Soccer Ball Birthday Cake
 Its time for another cake! I still owe this blog one entry on a baby shower cake we did in September. I don't have any pictures of it in part because the shower was at 4pm on the day that Michigan played Notre Dame at 3:30pm. So I was mainly concerned with getting the cake out of the house so I could watch football. Pictures were taken, but I don't have them yet.
 Here are the two halves of the soccer ball. Rice Krispy Treats were the base and a funfetti cake on the top. Both halves were formed using a soccer ball cake by Wilton.
 We used buttercream to stick the two halves together, then draped it in white fondant.
 Once the fondant was down Lauren lightly pressed the lines for the paneling and then used her stitching tool to complete the look.
 This was our original idea for the cake, but there was no good way to cover the 1 in a solid color. Fondant would have left ugly seams all over the place and nothing else would have been as smooth as fondant. I am sure we could have figured something out eventually, but we ended up abandoning the #1 in favor of a Happy Birthday placard.
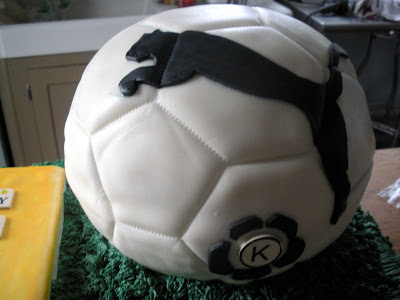
 The birthday boy and his cake.
From left to right: Kyle, Tricia, Lauren and I posing with the cake. You might notice the section of mostly missing cake to the right of the soccer ball. That plus most of the unseen back cake half of the soccer ball managed to feed everyone at the party. Lauren and I kind of eyeballed how much cake we needed. 13 x 9 seemed small, especially given the size of the soccer ball. So we got a 12" x 18" pan, but when we baked the first layer it seemed really thin. So we decided three layers would be better than two. It was only time constraints that stopped it from being 4 layers. Of course when we stacked it up the cake ended up being enormous. A catering website I looked up after the fact informed us that a 2 layer 12" x 18"cake serves 54 dessert sized portions. So I'm thinking this cake served roughly 81 from the bottom cake alone, plus another 10 or so out of the soccer ball.
Chicken, Pesto & Sun-Dried Tomato Pizza
 This recipe ought to look familiar. Its essentially the same as the Margherita Pizza, with the obvious changes with the toppings and the use of bread flour instead of all purpose flour. The flour change wasn't special to this pizza, I just happened to be out of flour and decided I'd give the bread flour a shot since its higher gluten content is supposed to create a chewier crust.
Chicken, Pesto, Sun-Dried Tomato Pizza:
- 1/4 cup pesto + 1 clove minced garlic (or to taste)
- 1-2 cups mozzarella cheese
- 1 lb diced, cooked chicken
- 1 pkg sun-dried tomatoes
- Shredded parmesan (optional)
- Feta cheese crumbles(optional)
- Preheat the oven with your pizza stone/baking sheet inside to 500 degrees.
- Cook your chicken. I typically dice it raw, marinate it in Italian dressing for 5 mins then saute it until cooked through (5 mins). If not that I'll use 1/4 - 1/2 cup chicken broth and poach the diced chicken and season it will salt & pepper. Either way make sure to strain or pat your chicken dry with paper towel before putting it on your pizza.
- .25 oz. pkt. active dry yeast
- 1/4 tsp. granulated sugar
- 3/4 cup warm (105-115 degrees) water, temperature measured with a thermometer
- 1 3/4 cups bread flour (AP works too, but bread flour tastes better)
- 1/2 tsp. salt
At this point you can either let the dough rise for 1-2 hours for a normal pizza crust or you can use it immediately for a thin crust pizza.
Turn dough onto a floured surface and knead by hand for 2 minutes. Stretch or roll your dough into a 12" or 14" circle on a flour, parchment or corn meal covered surface. Brush the top surface of the dough with olive oil.
 Remove your preheated pizza stone or baking sheet from the oven.Transfer your dough to the baking sheet/pizza stone, and quickly spread your pesto. Add your 1-2 cups of mozzarella cheese and top with the chicken and sun-dried tomatoes.
- Sprinkle feta and/or parmesan cheese (optional).
- Bake at 500 for 8-10 minutes. Let cool 2-5 minutes. Enjoy.
Margherita Pizza
 Okay, its been a long, long time since I've posted anything here. I am back in school full time this semester and working when I don't have class, so that doesn't really leave me much time to throw caution to the wind and tackle new recipes consistently enough to entertain the people that may or may not read this blog.
- 2 tablespoons extra virgin olive oil
- 1/2 lb. Roma tomatoes, chopped
- 1 clove garlic, crushed and finely chopped
- 1/2 tsp. salt
- 1/8 tsp. pepper (or to taste)
- 6 oz. (1.5 cups) mozzarella cheese, shredded
- 6 fresh basil leaves
- Extra virgin olive oil
- 1/4 cup fresh shredded parmesan cheese
- Preheat the oven with your pizza stone/baking sheet inside to 500 degrees.
- Combine 2 tablespoons olive oil, chopped tomatoes, garlic, salt and pepper in a bowl.
- .25 oz. pkt. active dry yeast
- 1/4 tsp. granulated sugar
- 3/4 cup warm (105-115 degrees) water, temperature measured with a thermometer
- 1 3/4 cups all-purpose flour
- 1/2 tsp. salt
- Remove your preheated pizza stone or baking sheet from the oven .
- Transfer your dough to the baking sheet/pizza stone, and quickly add your 1.5 cups of mozzarella cheese and top with the chopped tomatoes.
- Drizzle lightly with olive oil and stick the baking sheet/pizza stone back in the oven for 8-10 minutes.
- Top with basil and parmesan (if you want), let the pizza cool for 2-5 minutes and enjoy.
Madeira Cake w/ Strawberry Chocolate Ganache
 As part of expanding our (her) cake repetoire, Lauren and I have sort of committed to abandoning boxed cake mixes and using straight from scratch recipes. With the assistance of a cake decorating book that Rachel got for us, we took our first step in that direction last night. I don't have recipes for this entry because I don't have the book in front of me, and on top of that I didn't actually do any of the baking last night because I was busy doing the cooking (chicken salad and potato salad) and the dish washing so we didn't get in each other's way.What Lauren made was a Madeira cake filled with strawberries and chocolate ganache and covered with buttercream icing. No fondant this time around. The results were mixed. First off our biggest problem is that we aren't cooking by weight. So next on our list of ways to expand our culinary arsenal is a digital weight scale. Its way too much of a hassle to try to figure how many cups or tablespoons 310 grams of butter is, and if that number of cups/tbsp is the same for 310 grams of sugar (which it isn't).


The Lady & Sons Restaurant
 I just realized I never actually posted anything about our vacation. The vacation was great, and I'll return to share some words and pictures about crabbing and fresh seafood. But I'm going to use this post to focus on Savannah, Georgia and our trip to The Lady & Sons restaurant, owned by Paula Deen of the Food Network.

Salley's Birthday Cake
 Last week while on vacation, Lauren and her sister decided to make a fondant cake for their younger sister's birthday. I thought it was borderline insanity given that we were out of Lauren's kitchen, without any of her cake supplies and most importantly without a KitchenAid stand mixer. Bu they were determined to make it happen, so I looked up the fondant recipe, gave them a few pointers and then backed away slowly. Obviously the picture shows that it turned out just fine and here is why: the fondant recipe I was using worked, but it didn't create the most workable fondant.
- 1 - 16oz pkg mini-marshmallows
- 3 tbsp water
- 1 tbsp vanilla
6-8 cups3-4 cups powdered sugar- Vegetable shortening (for greasing everything that touches liquid marshmallow)
In other news, Lauren and I may be making a cake this weekend. Rachel dropped off an incredibly awesome and generous thank you gift to us for Sofia's Dr. Seuss cake. The gifts included a variety of cake decorating and fondant working tools. Lauren will be making a baby shower cake in September and wants to test out some ideas we've seen on Cake Boss and Food Network Challenge. On top of that we've also been contacted by an acquaintance of mine about doing a John Deere tractor wedding cake for August of 2010.
So in short order we're going to need to find some solid "from scratch" cake recipes and start fancying up the actual cake and frosting.
Black Magic Cupcakes
 Lauren made these last night as a peace offering for her coworkers. We're leaving Saturday morning for Charleston SC. We'll be gone for a week and from what I gather her vacation might hamstring a few people at work. Our agenda on vacation should provide for several food related post when we return:

