Kai's Soccer Ball Birthday Cake
 Its time for another cake! I still owe this blog one entry on a baby shower cake we did in September. I don't have any pictures of it in part because the shower was at 4pm on the day that Michigan played Notre Dame at 3:30pm. So I was mainly concerned with getting the cake out of the house so I could watch football. Pictures were taken, but I don't have them yet.
 Here are the two halves of the soccer ball. Rice Krispy Treats were the base and a funfetti cake on the top. Both halves were formed using a soccer ball cake by Wilton.
 We used buttercream to stick the two halves together, then draped it in white fondant.
 Once the fondant was down Lauren lightly pressed the lines for the paneling and then used her stitching tool to complete the look.
 This was our original idea for the cake, but there was no good way to cover the 1 in a solid color. Fondant would have left ugly seams all over the place and nothing else would have been as smooth as fondant. I am sure we could have figured something out eventually, but we ended up abandoning the #1 in favor of a Happy Birthday placard.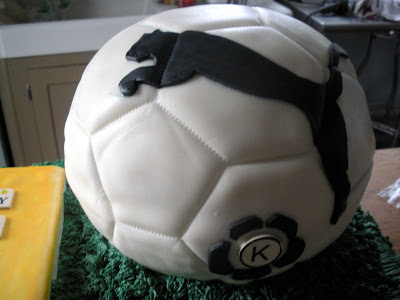
 The birthday boy and his cake.
From left to right: Kyle, Tricia, Lauren and I posing with the cake. You might notice the section of mostly missing cake to the right of the soccer ball. That plus most of the unseen back cake half of the soccer ball managed to feed everyone at the party. Lauren and I kind of eyeballed how much cake we needed. 13 x 9 seemed small, especially given the size of the soccer ball. So we got a 12" x 18" pan, but when we baked the first layer it seemed really thin. So we decided three layers would be better than two. It was only time constraints that stopped it from being 4 layers. Of course when we stacked it up the cake ended up being enormous. A catering website I looked up after the fact informed us that a 2 layer 12" x 18"cake serves 54 dessert sized portions. So I'm thinking this cake served roughly 81 from the bottom cake alone, plus another 10 or so out of the soccer ball.
Madeira Cake w/ Strawberry Chocolate Ganache
 As part of expanding our (her) cake repetoire, Lauren and I have sort of committed to abandoning boxed cake mixes and using straight from scratch recipes. With the assistance of a cake decorating book that Rachel got for us, we took our first step in that direction last night. I don't have recipes for this entry because I don't have the book in front of me, and on top of that I didn't actually do any of the baking last night because I was busy doing the cooking (chicken salad and potato salad) and the dish washing so we didn't get in each other's way.What Lauren made was a Madeira cake filled with strawberries and chocolate ganache and covered with buttercream icing. No fondant this time around. The results were mixed. First off our biggest problem is that we aren't cooking by weight. So next on our list of ways to expand our culinary arsenal is a digital weight scale. Its way too much of a hassle to try to figure how many cups or tablespoons 310 grams of butter is, and if that number of cups/tbsp is the same for 310 grams of sugar (which it isn't).


Salley's Birthday Cake
 Last week while on vacation, Lauren and her sister decided to make a fondant cake for their younger sister's birthday. I thought it was borderline insanity given that we were out of Lauren's kitchen, without any of her cake supplies and most importantly without a KitchenAid stand mixer. Bu they were determined to make it happen, so I looked up the fondant recipe, gave them a few pointers and then backed away slowly. Obviously the picture shows that it turned out just fine and here is why: the fondant recipe I was using worked, but it didn't create the most workable fondant.
- 1 - 16oz pkg mini-marshmallows
- 3 tbsp water
- 1 tbsp vanilla
6-8 cups3-4 cups powdered sugar- Vegetable shortening (for greasing everything that touches liquid marshmallow)
In other news, Lauren and I may be making a cake this weekend. Rachel dropped off an incredibly awesome and generous thank you gift to us for Sofia's Dr. Seuss cake. The gifts included a variety of cake decorating and fondant working tools. Lauren will be making a baby shower cake in September and wants to test out some ideas we've seen on Cake Boss and Food Network Challenge. On top of that we've also been contacted by an acquaintance of mine about doing a John Deere tractor wedding cake for August of 2010.
So in short order we're going to need to find some solid "from scratch" cake recipes and start fancying up the actual cake and frosting.
Black Magic Cupcakes
 Lauren made these last night as a peace offering for her coworkers. We're leaving Saturday morning for Charleston SC. We'll be gone for a week and from what I gather her vacation might hamstring a few people at work. Our agenda on vacation should provide for several food related post when we return:
Sofia's Dr. Seuss Cake
 This weekend, Lauren and I spent some time constructing our greatest cake yet. The inspiration was Sofia's 4th birthday and her love of Dr. Seuss. Sofia is the daughter of our friends Peter and Rachel. About a year ago Lauren and I made a two-tiered fondant covered birthday cake for Lauren's friend Julie. In the 12 months since that cake we've been seeing all sorts of competive cake building competitions on Food Network Challenge. So back in March I emailed Rachel about doing a Dr. Seuss cake for Sofia's birthday. This weekend Lauren and I created and delivered it.


 Lastly, Lauren made the blue fish for the fish bowl. He was constructed out of the remaining blue fondant and some wooden toothpicks.
Marshmallow Fondant
 I wanted to knock out this entry real quick before I get to the main event, so that I can discuss these components more in depth as recipes and leave the cake thread to discussion of the construction.
- 1 - 16oz pkg mini-marshmallows
- 3 tbsp water
- 1 tbsp vanilla
- 6-8 cups powdered sugar
- Vegetable shortening


- 3 tbps butter
- 1 - 10.5 oz bag of mini marshmallows
- vegetable shortening
- 1/2 cup (1/2 stick) of vegetable shortening
- 1/2 cup softened butter
- 1 teaspoon vanilla
- 4 cups powdered sugar
- 3 tbsp milk
The Kitty Litter Cake
 Lauren and I made this about a year ago for her birthday, or near her birthday. If I recall it was a not so subtle "thanks for making me bring my own birthday treat to the office" for her work. Plus her birthday is April Fool's Day, so some humor was expected.
Anyhow I was going through an online photo album of mine and came across that picture. So I thought I'd share, since a cake like this is usually the kind of thing everyone says they want to make or tells people that a friend of a friend of a co-worker made one time. It may as well be listed on Snopes. Here was our effort to add to the Internet's anthology of Kitty Litter cakes:
- 1 (18.25 ounce) package German chocolate cake mix
- 1 (18.25 ounce) package white cake mix
- 2 (3.5 ounce) packages instant vanilla pudding mix
- 1 (12 ounce) package vanilla sandwich cookies
- 3 drops green food coloring
- 1 (12 ounce) package tootsie rolls
- 1 brand new kitty litter box
- 1 brand new kitty litter scoop
Prepare pudding according to package directions and chill until ready to assemble.
Crumble sandwich cookies in small batches in a food processor, scraping often.
Set aside all but 1/4 cup. To the 1/4 cup add a few drops of green food coloring and mix. When cakes are cooled to room temperature, crumble them into a large bowl. Toss with 1/2 of the remaining cookie crumbs, and the chilled pudding. You probably won't need all of the pudding, you want the cake to be just moist, not soggy.
 Put cake mixture into box. Put half of the unwrapped tootsie rolls in a microwave safe dish and heat until softened. Shape the ends so that they are no longer blunt, and curve the tootsie rolls slightly so that they look like cat turds. Bury tootsie rolls randomly in the cake and sprinkle with half of the remaining cookie crumbs. Sprinkle a small amount of the green colored cookie crumbs lightly over the top.
Heat 3 or 4 of the tootsie rolls in the microwave until almost melted. Scrape them on top of the cake and sprinkle lightly with some of the green cookie crumbs. Heat the remaining tootsie rolls until pliable and shape like cat turds. Spread all but one randomly over top of cake mixture. Sprinkle with any remaining cookie crumbs. Hang the remaining tootsie roll over side of litter box and sprinkle with a few green cookie crumbs. Serve with the pooper scooper for full effect.
The cake is surprisingly good.
New York Style Cheesecake Done Right
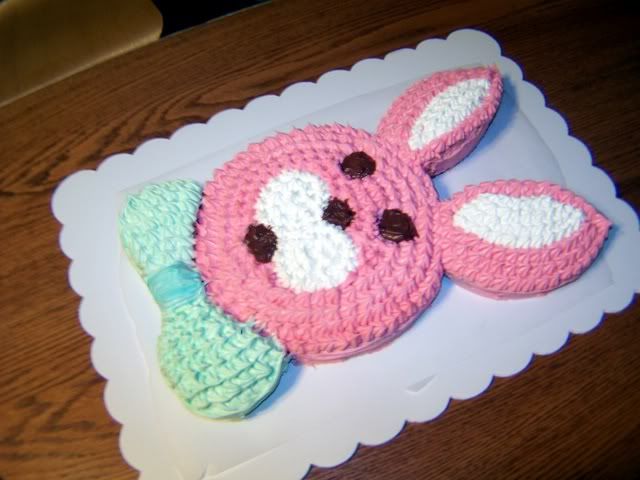
 As usual (and much to our delight), Lauren and I were charged with dessert for Easter dinner. Last year we made this Easter Bunny cake.
This year we went with New York style mini-cheesecakes. Lauren has three sets of mini cheesecake pans for just this sort of thing and generally we used a completely different recipe for the minis than we use for the big ones. A typical mini cheesecake batter uses about 5 blocks of cream cheese and makes about 36 of these bite-sized cheesecakes. 36 and thats it. So the plan was to make 36, give a bunch of them to Lauren's roommate and take the rest to my parents' house for Easter dinner. However we quickly found out that using the New York style batter to make mini cheesecakes was going result in a whole lot more. We made 36 mini cheesecakes and barely put a dent in the batter. Rather than do any more minis, we took the remaining batter and made a 9 inch cheesecake, which we took to my parents house for Easter. We left a tray of about 18 mini cheesecakes in her refrigerator.
I am so sick of cheesecake. I'm hoping Lauren takes the remaining minis and drops them off at work.
Lauren decorated the big cheesecake with peaches, strawberries and blueberries with picket fences made from white chocolate Candy Kwik. The little one above was also supposed to have its own picket fence Easter basket decoration, but we were so cheesecaked out that we didn't even bother once we decided not to take them to Easter dinner.
In case it was unclear, the recipe for this cheesecake is the exact same as the one I previously posted for New York style cheesecake. Only this time we baked it at the correct temperature, so the top didn't get hideously browned.
New York Style Cheesecake
Today is Lauren's birthday (Happy Birthday!) and the (ridiculous) tradition at her work is that you bring in a treat for the office on your birthday. That seems like a kick in the crotch to me, but whatever. We debated making mini-cheesecakes (Lauren's specialty) but decided against it because of the rather large amounts of cooling and storage space needed to make enough for an office. Instead we settled on one 10 inch New York Style cheesecake. My problem with it is that it is so rich that about 25% of it gets wasted by people whose eyes are bigger than their stomach. It doesn't matter how many times you warn them, at least one person cuts into it like its a slice of pizza.
Its been since Christmas since we've made a cheesecake, a fairly long drought by our standards. So I really want a piece of this one. Lauren has agreed to cut us a slice after she presents it to her office. On to the recipe:
To make a New York Style cheesecake you're going to want to use a Kitchen-Aid stand mixer. Other recipes can be made with a powered hand mixer, but this one is so cream cheese intensive that you'll risk burning out your motor. Trust us, its happened before.
- 1/2 cup all-purpose flour
- 7 packages cream cheese (8oz, room temperature)
- 2 1/4 cups sugar
- 1 cup sour cream (room temperature)
- 1 1/2 teaspoons vanilla extract
- 5 large egg yolks and whites (separated)
- 1 stick (4oz) unsalted butter (melted)
- 1 sleeve graham crackers (crushed)
- 1 sleeve/row Chips Ahoy chocolate chip cookies (crushed)
- Large sheet, heavy duty aluminum foil
- 1 disposable turkey roasting pan (or 13 x 9 in glass pan)
- 1 10 inch spring form pan
 Wrap the exterior bottom of a 10 inch spring form pan with your aluminum foil in a such a way that you believe the seams of your pan are "sealed" from water. Basically you want to wrap one solid layer on the bottom of your pan around the seams, and then 2-3 more sheets half way around the bottom and up the sides so that your flat sheet is insulated from the water. When you get to the water bath step you're going to want your water about halfway up the side of your pan, so wrap your foil above that area. Mix the cookies and graham crackers with the melted butter and press into the bottom of a foil wrapped 9-inch spring form pan. Bake at 350 for 10 minutes-15 minutes. Remove and let cool.
Take your 7 blocks of cream cheese, add them to your mixing bowl and beaten until no lumps remain. The beaten cream cheese will be sticky and firm, like spreadable cream cheese. Whisk together your flour and sugar, then on low speed add the sugar mixture to your beaten cream cheese in a slow steady stream (or multiple installments). As this mixes in, the batter should become softer and smoother. Remove the bowl from the mixer and scrape the sides, checking for any lumps of unmixed cream cheese.
 Next add the sour cream and vanilla, mixing on low speed until smooth. Add the egg yolks one at a time on low speed, until just mixed (you see no yellow streaks). Be careful not to overmix at this point, lest your cake become dense, heavy and prone to cracking.
Transfer your cheesecake filling to a large mixing bowl and clean out your stand's mixing bowl. Using the whipping attachment, whip your egg whites on high speed until stiff peaks form. By hand, fold the egg whites into the cheesecake filling.
Transfer your completed cheesecake filling into your spring form pan, leaving a small amount of space (1/8th inch) between the filling and the rim of the pan, so your cake can crown early in the bake without overflowing. Shake the pan side to side a little to remove any large air pockets. If you have extra filling that will not fit, that is ok. Sometimes it all fits, other times it does not. It sort of depends on how much air you leave in the batter. In batter form this cheesecake filling may not taste as sweet as you might expect. That is normal. Your finished cheesecake will not taste exactly that way.
Take your boiling water and pour it into your roasting pan. You'll want the water to rise halfway up your spring form, or at the very least not higher than your aluminum foil. If you are not using a roasting pan or your spring form will not fit, pour the water into a 13 x 9 inch pan and place that pan on the rack below your cheesecake. Should you decide to use a glass pan, make sure the water and the glass are of a similar temperature before you pour the water in. Also worth noting is that if your cheesecake and water bath are separate, make sure you use a little less water so that it still boils off and evaporates. The moisture from the evaporating water will keep the cake moist.
 Bake your cheesecake in the center of the oven at 350 for 45 minutes, then reduce the temperature to 325 for an additional 30 minutes. When the top is golden brown and the center is firm but slightly jiggly to the touch, turn the oven off, leave the oven door ajar and let the cheesecake sit for one hour. After one hour remove the cheesecake, let it cool completely (about 2 hours, uncovered). Refrigerate the cake (in the pan) for 4-6 hours or overnight. Before removing the spring form ring, run a knife around the outside of the cake to prevent sticking.
You'll notice the lack of baking soda, baking powder and (relatively speaking) flour. The absence of these things makes cheesecake baking a fairly inexact science. It is entirely possible that your cheesecake may require closer to double the amount of baking time. That is fine. It is pretty difficult to overcook a cheesecake. So long as your top isn't splitting while its baking, you can give or take an extra 20-30 minutes of bake time in lieu of resting it in the oven with the door ajar. If your top starts browning severely, lay some aluminum foil over the top of it. If you notice your cheesecake growing a top hat (aka separation between the crowned filling at the top of the spring form ring exposing the pure interior around the edges, don't worry. As the cake cools, the top will deflate and the "hat" will disappear.
 Further proof that cheesecake is an inexact science lies in these pictures. The rich, dark brown top you're seeing is the result of a mistake with the oven. "We" set the temperature to 425 for the first hour, before realizing the temperature should be 325 or 350. The result was an overdone top, but as you can see that didn't affect the lower portions of the cake. The superficial remedy for this mistake was to fill the center of the cake with sauteed/caramelized apple slices and decorate the outer edges with whipped cream (not pictured).
I am sure there are dozens more tips and tricks I could offer, but this is neither the first nor the last cheesecake I'll have on this blog, so for now I'll just leave this post as is.
Pumpkin Turtle Cheesecake
 For dessert today my family will be having this Pumpkin Turtle Cheesecake that I stumbled upon in the checkout lane of the grocery store. The recipe is from the Pillsbury Thanksgiving Classics Cookbook.
Crust
* 1 1/2 cups chocolate graham crackers (slightly more than 1 sleeve)
* 1/4 cup butter or margarine, melted
Filling
* 1/4 cup all-purpose flour
* 2 teaspoons pumpkin pie spice
* 1 (15 ounce) can pumpkin (not pumpkin pie mix)
* 4 (8 ounce) packages cream cheese, softened
* 1 cup packed brown sugar
* 2/3 cup granulated sugar
* 5 eggs
Topping
* 1/2 cup pecans (or walnuts), toasted and chopped
* 2 ounces bittersweet baking chocolate, coarsely chopped
* 1 tablespoon vegetable oil
* 1 cup caramel topping
Mix the crushed graham grackers and melted butter to make the crust. Spread the crust in the bottom of your springform pan and compact it with something wide and flat (I used the bottom of a coffee mug). Pre-bake at 300 for 8-10 minutes.
Using an electric mixer mix the room temperature cream cheese, making sure to get rid of any lumps. Add eggs one at a time while, scraping the bowl in between to avoid lumps and promote a homogeneous mixture. Add sugar and continue to mix. With the brown sugar be sure to break up any hard sugar balls with your fingers. The mixer won't do the job.
In a separate bowl mix the flour, pumpkin spice and pumpkin filling.
Add the pumpkin filling to your cheesecake filling and mix thoroughly. Your end result should appear to be a very light orange with freckles typical of a pumpkin pie. Don't worry if the batter doesn't taste good on its own. Some cheesecake is like that. This is one of them.
The recipe calls for a 75-85 minute bake at 300 degrees. I use a steam bath for my cheesecakes so I pushed the temperature to 325. Every cheesecake is different, so either way you should bake for about 70 minutes and then check periodically to see if the cheesecake is set and golden around the edges and slightly firm in the middle.
Cool at room temperature for 2 hours, and in the refrigerator for 4 additional hours (or overnight).
For the topping I chopped and toasted (aka sauteed) walnuts and set them on top. Then I steam melted (stainless steel mixing bowl over a pot of boiling water) a 1/2 cup of semi-sweet chocolate chips, dipped the tines of a fork in the melted chocolate and pretended to write cursive over top of the cheesecake. Same with the caramel (though I used the microwave). That gave it the wacky, artfully out of control look you see. Later tonight or tomorrow, I'll add an update to the bottom of this post and let you know what I thought about its taste.
Final Verdict:
Not as sweet as regular cheesecake, not as pumpkin as pumpkin pie. So in the end it sort of leaves you pining for both. A decent recipe, but not anything to write home about. The guests enjoyed it more than I did, but I felt like they would have been more impressed by a normal cheesecake with similar toppings.

 Posts
Posts