Kai's Soccer Ball Birthday Cake
 Its time for another cake! I still owe this blog one entry on a baby shower cake we did in September. I don't have any pictures of it in part because the shower was at 4pm on the day that Michigan played Notre Dame at 3:30pm. So I was mainly concerned with getting the cake out of the house so I could watch football. Pictures were taken, but I don't have them yet.
 Here are the two halves of the soccer ball. Rice Krispy Treats were the base and a funfetti cake on the top. Both halves were formed using a soccer ball cake by Wilton.
 We used buttercream to stick the two halves together, then draped it in white fondant.
 Once the fondant was down Lauren lightly pressed the lines for the paneling and then used her stitching tool to complete the look.
 This was our original idea for the cake, but there was no good way to cover the 1 in a solid color. Fondant would have left ugly seams all over the place and nothing else would have been as smooth as fondant. I am sure we could have figured something out eventually, but we ended up abandoning the #1 in favor of a Happy Birthday placard.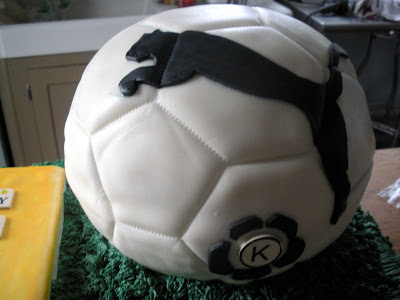
 The birthday boy and his cake.
From left to right: Kyle, Tricia, Lauren and I posing with the cake. You might notice the section of mostly missing cake to the right of the soccer ball. That plus most of the unseen back cake half of the soccer ball managed to feed everyone at the party. Lauren and I kind of eyeballed how much cake we needed. 13 x 9 seemed small, especially given the size of the soccer ball. So we got a 12" x 18" pan, but when we baked the first layer it seemed really thin. So we decided three layers would be better than two. It was only time constraints that stopped it from being 4 layers. Of course when we stacked it up the cake ended up being enormous. A catering website I looked up after the fact informed us that a 2 layer 12" x 18"cake serves 54 dessert sized portions. So I'm thinking this cake served roughly 81 from the bottom cake alone, plus another 10 or so out of the soccer ball.
Madeira Cake w/ Strawberry Chocolate Ganache
 As part of expanding our (her) cake repetoire, Lauren and I have sort of committed to abandoning boxed cake mixes and using straight from scratch recipes. With the assistance of a cake decorating book that Rachel got for us, we took our first step in that direction last night. I don't have recipes for this entry because I don't have the book in front of me, and on top of that I didn't actually do any of the baking last night because I was busy doing the cooking (chicken salad and potato salad) and the dish washing so we didn't get in each other's way.What Lauren made was a Madeira cake filled with strawberries and chocolate ganache and covered with buttercream icing. No fondant this time around. The results were mixed. First off our biggest problem is that we aren't cooking by weight. So next on our list of ways to expand our culinary arsenal is a digital weight scale. Its way too much of a hassle to try to figure how many cups or tablespoons 310 grams of butter is, and if that number of cups/tbsp is the same for 310 grams of sugar (which it isn't).


Blueberry Space Ship Muffins
 Yesterday I made muffins for Tuesday morning breakfast and a Monday night snack. I used the sour cream muffin recipe, added a tablespoon of lemon juice and a small package of blueberries.
2 cups flour
1 tablespoon baking powder
1/2 teaspoon baking soda
1/2 teaspoon salt1/4 teaspoon nutmeg
Wet Ingredients
2 eggs
1 cup sour cream
2/3 cup brown sugar (packed)
1 stick butter (melted)
1 teaspoon vanilla
Whisk together dry ingredients, then wisk together wet ingredients. Combine wet and dry with a few quick strokes until the batter is just formed. Bake at 350 or 375 for 10-12 minutes, or until you can stick a fork in the middle and have it come out clean.

Belgian Waffles
 I finally got around to it. This morning I woke up at 10am, went the store to buy some milk because I didn't have enough and then got on with the recipe.
3 cups warm milk (105 to 115 degrees)
1 envelope active dry yeast
1 1/2 sticks of butter, melted then cooled to lukewarm
1/2 cup sugar
3 eggs, yolks and whites separated
2 teaspoons vanilla
1 1/2 teaspoons salt
4 cups all-purpose flour
Add the yeast to the warm milk and let stand for 5 minutes. I am pretty sure if the milk is too warm it will hamper the yeast's activity. So I used a small thermometer to make sure I was at least near the right range. Unlike a yeast dough recipe you're not going to see the yeast foam after 5 minutes but that is ok. Whisk the milk until smooth. When your melted butter is lukewarm, add that to your milk and whisk.
Add the sugar. When you add the sugar you should be able to hear the yeast crackle in celebration. The sugar is food for them. If that doesn't happen, you might be in big trouble. Add the egg yolks, whisk, then add the salt and vanilla and whisk until smooth.
Then you need to add your 4 cups of flour in three installments. Beat until smooth between each addition. Your final batter should be thicker than waffle batter but still pourable. You'll be able to scrape it away clean from the sides, as it will stick to your beating spoon like a runny dough.
Cover with plastic wrap and set aside at room temperature for 1- 1 1/2 hours, until the batter has doubled in size. Beat your 3 egg whites with an electric mixer until soft peaks form (aka really foamy). Remove the plastic wrap from your batter and fold in the egg whites with a large spoon.
Fire up the waffle iron and enjoy. This makes 12 delicious, but pretty heavy waffles. I think you can store the batter, provided you let it come to room temperature before you use it again. The waffles taste similar to a waffle cone. At least that is what Lauren says. I topped mine with strawberry syrup and whipped cream.
Waffles
Well, I had hoped to be posting about Belgian Waffles right now but my weekend didn't really work out like that. Lauren had to go into work Saturday morning and I had soccer at 12:30 so there was no opportunity for an elaborate breakfast. Sunday brunch was the next plan, so I made sure to pick up eggs, flour, syrup and toppings from Meijer. But when I opened my cook book I realized I had already made a terrible error. Belgian waffles, true Belgian waffles, use yeast. Which means the batter needs time to proof. The recipe is something like this:
1 (.25 ounce) package active dry yeast
1/4 cup warm milk (110 degrees F/45 degrees C)
3 egg yolks
2 3/4 cups warm milk (110 degrees F/45 degrees C)
3/4 cup butter, melted and cooled to lukewarm
1/2 cup white sugar
1 1/2 teaspoons salt
2 teaspoons vanilla extract
4 cups all-purpose flour
3 egg whites
Activate the yeast in the warm milk, set aside for 5 minutes. Then combine only the wet ingredients, followed by only the dry ingredients, then add the ingredients together and let sit for an 60-90 minutes until doubled in size.
But we were hungry now, so we scrapped the Belgian waffle idea and just made regular waffles from scratch:
- 1 3/4 cups all-purpose flour
 1 3/4 teaspoons baking powder
- 1/8 teaspoon fine salt
- 1/8 teaspoon ground nutmeg
- 1 1/2 cups milk, at room temperature
- 2 large eggs, at room temperature, separated
- 1/2 teaspoon vanilla extract
- 1/4 cup unsalted butter, melted, plus more for brushing the iron
- 1 large egg white, at room temperature
- 1/4 cup sugar

I am going to try to talk Lauren into Belgian Waffles for dinner later this week, but I suspect I'll have to wait for Saturday morning. What I really want is to try chicken and waffles.
The MacGyver Breakfast

When I've keyed in on at least one bountiful ingredient I open up my Joy of Cooking cookbook and check the back pages for recipes utilizing that ingredient. When I opened the fridge last Saturday I couldn't get my mind off the bottle of lemon juice I had purchased the week before when I made chicken salad. I wanted pancakes, I wanted them to have flavor but all I had was lemon. That is when I discovered
Lemon Pancakes:
Dry Ingredients
1 cup flour
1/3 cup sugar
1 1/2 teaspoons baking powder
1/2 teaspoon baking soda
1/4 teaspoon salt
Wet Ingredients
3/4 cup sour cream
1/3 cup milk
lemon zest
1/4 cup lemon juice
3 tablespoons butter (melted)
1 egg 1
1/2 teaspoons vanilla
Mix the dry ingredients with a wisk, in a separate bowl mix all the wet ingredients until it becomes a milk-like consistency. By hand quickly mix the wet ingredients with the dry for 15-20 seconds. The batter will be light and airy. Do not overmix the batter or the pancakes will be dense and not nearly as good. Heat a skillet and make pancakes.
These pancakes are awesome on their own, but the next time I plan on making them I'm going to throw in some blueberries. I didn't bother with the lemon zest since I was using bottled lemon juice.
This post isn't done yet. A couple weeks ago I had a similar, but far less spectacular, experience with sour cream. The night before Lauren and I had made some white chicken chili and as a result had most of a 16 oz container of sour cream left in the fridge. So when I went rummaging through it the next morning looking for potential breakfast items I couldn't get my mind off of the sour cream. It might be weeks before we do anything else with sour cream and I just don't trust expiration dates, especially when the container in question costs about $1.50.
Sour Cream Muffins:
Dry Ingredients
2 cups flour
1 tablespoon baking powder
1/2 teaspoon salt
1/4 teaspoon nutmeg
Wet Ingredients
2 eggs
1 cup sour cream
2/3 cup brown sugar (packed)
1/2 stick butter (melted)
1 teaspoon vanilla
Bake at 350 or 375 for 10-12 minutes, or until you can stick a fork in the middle and have it come out clean.
This is an excellent base muffin recipe. The sour cream and brown sugar keep the middle and muffin top nice and moist. They are pretty good on their own but a bit less sweet than you might expect. My suggestion here would be to add either lemon and blueberries or banana and walnuts to the muffin batter to round out the taste.
Other sour cream muffin addition possibilities include Snickerdoodle (pictured), cherry & peach, apple cinnamon and chocolate.
Sour cream is pretty awesome.
Good Job Moms
 Sunday has become pasta day over at Lauren's house. After brunch we usually get out the eggs and flour and make a pound of pasta for quick dinners later in the week. Yesterday I made some to give to a friend for letting me commandeer his computer Saturday afternoon. The use of semolina flour made things go so quick and smooth that we finished up without any bickering and decided we wanted to make more. So I went to the grocery store and got more flour and eggs so we could make tri-color fettucine gift bags for our friends with children. I hope nobody takes it the wrong way, we were just thinking it might be nice to give some friends an easy dinner starter for some night when things get a little hectic.
The green pasta is spinach fettucine. The red is sun-dried tomato fettucine and the light-colored pasta is basil & oregano herb fettucine. The pasta will keep for about a month in the freezer. When you're ready to cook it just boil some water, add salt and cook the noodles for about 4 minutes. I think its just under a pound of fettucine, so it should be good for 2-3 servings, but to be honest I haven't quite figured out how to do the conversions between the weight of the pasta dough (1.5-2 lbs), the weight of the rolled and cut noodles (presumably 1.5-2lbs), the lighter weight of the dried/frozen coils and the number of cups of pasta when its cooked.
I'll be making deliveries tonight after work.
Spaghetti & Meatballs
 Early yesterday I felt a need to revisit fresh pasta, considering how poorly my attempt at ravioli went. Throughout the week I did some minor research and noticed that about half the recipes or people I talked to mentioned the use of semolina flour. Evidently its a coarser flour used in commercial pastas and lends yellow color and stretchiness (less tearing) to the final product. I didn't want to like it because even at a store like Meijer, semolina flour is $3.50 for 24 oz. Essentially a dollar per cup for flour is ridiculous. Not only that but 24oz was the biggest bag they had, so even I am willing to pay that much for flour I'll probably need to go to the grocery store to buy it at least every other time we make pasta. In the end though, it was worth it.
Spaghetti is by far my least favorite pasta. It is not very creative or flexible and I think that as a child I just had a few too many bad spaghetti dinners when it was dad's night to make dinner. But fresh spaghetti is awesome. I can't really explain it because it seemed pretty ordinary while I was eating it. But some hours later I was still thinking about the spaghetti and realized how much better it was than the last time I boiled a box of store bought spaghetti.
In addition to the pasta we had homemade turkey meatballs from Giada DeLaurentis.
Semolina Pasta
1 1/2 cups all-purpose flour
1 1/2 cups semolina flour
4 large eggs
2 tbsp olive oil
3tbsp water
Turkey Meatballs
1/4 cup plain dried bread crumbs
2 tablespoons whole milk
2 large eggs, lightly beaten
3/4 cup grated Romano
1 pound ground turkey
Salt and freshly ground black pepper
1/4 cup extra-virgin olive oil
5 cups tomato sauce
 In a large bowl add bread crumbs milk and mix until well combined. Mix in eggs and 1/2 cup Romano cheese and mix well. Add turkey and gently combine, being careful not to overwork the meat. Season with salt and pepper. Shape into golf-size balls.
In a large skillet heat the oil over medium high heat. When almost smoking, add meatballs and without moving or turning the meat, allow it to brown for about 3 minutes. Turn meatballs and brown other side. Continue to cook until all sides are golden brown, about 8 minutes total. Add tomato sauce and bring to a boil. Lower heat and allow meatballs to simmer for 5 minutes. Turn off heat and keep warm on stove. Be careful not to overhandle the meatballs since they are soft and fragile.
In a large pot, bring to a boil 6 quarts of salted water. Add pasta and cook until al dente, about 8 minutes. Drain pasta in a colander. Do not rinse pasta with water since you want to retain the pasta natural starches so that the sauce will cling to the pasta.
Remove meatballs from sauce and place in serving bowl. Pour some tomato sauce over meatballs, but leave about 1 cup of sauce in skillet. Place the cooked pasta into the skillet with the remaining sauce and toss well. Pour sauced pasta into a large serving bowl. Serve alongside the meatballs.
I don't have pictures of the meatballs but they turned out very well. If you decide to make them you need to know that during the first three minutes they have the ability to get very brown on the bottom without showing any other signs that they're cooking. So you need to keep on top of them and turn them per the instructions in the recipe. If you do let them get a little crunchy on one side just make sure you let them simmer in the tomato sauce a little longer to soften them up.Lastly, we made about 1.5 - 2lbs of pasta so we had quite a bit extra. The simplest way to store fresh ribbon pasta is to make coils with a large spoon, and freeze them for 1-2 hours on a baking sheet. After 1-2 hours remove the hardened coils from the baking sheet, place in a freezer safe storage bag and freeze for up to a month.
Spinach & Chicken Ravioli
 Yesterday I decided to again test the abilities of the KitchenAid pasta set by making my own ravioli. I don't have the ravioli maker attachment so I prepared for a fairly long and tedious process in order to have ravioli with chicken on the inside instead of the outside. As far as recipes go, everything was very simple. I used a basic pasta dough recipe, ricotta cheese, spinach and chicken. To top it we used some store-bought alfredo sauce with sauteed bell peppers.
The first mistake I made was in buying fresh spinach instead of frozen. On Wednesday when we made spinach pasta we used frozen spinach, but even after being thawed and squeezed it still retained enough moisture to make the dough very sticky. In hopes of avoiding that a second time I bought one 10oz bag of fresh spinach. Of course in order to use it for filling I had to trim all the stems, pulse it in a food processor and cook it in a skillet, all of which yielded exactly the same 10 oz of spinach as the frozen package with just as much moisture. Once I dried the spinach, I mixed it with the ricotta cheese and some diced cooked chicken I had also pulsed in the food processor.
At this point Lauren joined the process and we rolled out some dough. Some very sticky and stretchy dough. But with some patience (and frustrated bickering) we managed to put together about 25 finished ravioli.
We had a ton of leftover filling, but by that point we were both so annoyed with process that we decided to refrigerate it and figure something else out. In my estimation there was enough extra filling to make another 30-40 ravioli.
Once we cooked the ravioli, we ended up losing about four ravioli to leaks and holes in the dough.
So to review, we started this process around 3:30pm. We finished at almost 6pm. And we netted 21 cooked ravioli.
This was so not worth it, regardless of the actual taste of the finished product. I blame the dough. It was too stretchy, which was probably my fault. This dough might have worked for cut noodles, but it was never going to work for ravioli.
In summary, with some refinement (and possibly the ravioli maker) in the assembly process homemade ravioli would be a worthwhile process if your plans were to eat a small portion (25 or less) and freeze the rest (50+) for easy meals later in the week. But at the moment for me it just isn't worth the effort.
Shrimp Scampi
 Using the KitchenAid pasta attachment set I got Lauren for Christmas we made an awesome Shrimp Scampi with Fettucine. We used a mix between an herb pasta (light) and a spinach pasta (green) for the noodles. The shrimp was caught wild, then frozen by Lauren's dad back in September. All in all the meal took us about 2 hours. Not all that time was active but we had to figure out how to use the pasta attachments, thaw the shrimp, then peel and devein them.
Herba Pasta
2 cups unbleached flour
3 eggs
1/2 tsp salt
1 tsp olive oil
1/4 cup mild herb (basil)
1/4 cup strong herb (oregano)
Mix the ingredients and knead into a reasonably smooth lump of dough. Cut into 4 pieces, wrap loosely in plastic wrap and let sit for 1 hour before using.
Spinach Pasta
2 cups unbleached flour
2 eggs
1/2 tsp salt
1 tsp olive oil
1 pkg (10 oz) frozen spinach, thawed, dryed thoroughly
Mix the ingredients and knead into a reasonably smooth lump of dough. Cut into 4 pieces, wrap loosely in plastic wrap and let sit for 1 hour before using.
Shrimp Scampi
1 pound fettucine
4 tablespoons butter
4 tablespoons extra-virgin olive oil, plus more for drizzling
2 shallots, finely diced
2 cloves garlic, minced
Pinch red pepper flakes, optional
1 pound shrimp, peeled and deveined
Kosher salt and freshly ground black pepper
1/2 cup dry white wine
Juice of 1 lemon
1/4 cup finely chopped parsley leaves
Cook pasta in boiling water 6 - 8 min or to desired doneness. Meanwhile, in a large skillet, melt 2 tablespoons butter in 2 tablespoons olive oil over medium-high heat. Saute the shallots, garlic, and red pepper flakes (if using) until the shallots are translucent, about 3 to 4 minutes. Season the shrimp with salt and pepper; add them to the pan and cook until they have turned pink, about 2 to 3 minutes. Remove the shrimp from the pan; set aside and keep warm. Add wine and lemon juice and bring to a boil. Add 2 tablespoons butter and 2 tablespoons oil. When the butter has melted, return the shrimp to the pan along with the parsley and cooked pasta. Stir well and season with salt and pepper. Drizzle over a bit more olive oil and serve immediately.
Yes, these are the actual pictures of our creation. I got a digital camera for Christmas.
Sticky Buns Defeated
 Last night we used our Saturday night food experiment to revisit last weekend's sticky bun nightmare. During the week in between I got a tried and true recipe from the mother of a friend, and used that to make our dough (using all-purpose flour only).
SWEET YEAST DOUGH
2pk (1/4 oz. each) active dry yeast
1/4 cup warm water
3 Eggs
1/3 cup granulated sugar
2 tsp salt
1/2 tsp baking soda
1 cup buttermilk or sour milk
1/2 cup melted butter or vegetable oil
3 3/4 cup all-purpose flour
2 cup whole wheat flour
1/4 cup wheat germ
Note: All-purpose flour can be substituted for wheat flour and germ, in roughly the same quantity--then you can skip the step of combining them in a separate bowl. Sprinkle the yeast over the warm water in a small bowl, stir, and let stand until soft, about 5 minutes. Reserve.
In a large bowl, combine eggs, sugar, salt, baking soda, buttermilk, and butter, and beat till smooth. Stir in reserved yeast. In a separate bowl, combine the flours and wheat germ. Then add 3 cups of the dry mixture to the wet ingredients, beating until well blended. Add 2 more cups of the dry ingredients and beat until the dough just holds together. Turn out onto a lightly floured board and knead for 1 minute. Let the dough rest for 10 minutes. Knead the dough again, sprinkling on the remainder of the flour mixture as needed, until smooth and elastic, about 10 minutes. Place in a greased bowl, turn, cover with plastic wrap, and let rise in a warm place until about doubled in bulk, about 60 minutes.
From this point on, we finished using Bobby Flay's filling and sticky bun goo, but that only accounted for half of the dough. The awesome thing about this dough recipe is that its versatile enough to make cinnamon rolls or sticky buns, you just need to decide for yourself how you finish once the dough has risen and has been rolled out.
These buns sticky buns are cartoonishly large, to the point that you might suspect they'd been stolen by a cartoon character from a window sill in the deep south. This recipe makes 12 rolls, so we used six last night to make sticky buns and saved six for Monday morning to make cinnamon rolls. All we'll need for that is to bake the rolls, take some softened cream cheese and mix it with a small amount of milk and confectioner's sugar to make a topping.
Thank you Rebecca and thank you Cindy for helping me out on this.
(By the way, here is the rest of that recipe:)
Punch the risen dough down and turn it out onto a lightly floured surface. Roll out into a 15x24-inch rectangle about 1/2-inch thick. Sprinkle the reserved filling over the dough, gently pressing the mixture into the dough with your fingers. Beginning with the short end, roll the dough up like a jelly roll. Slice crosswise into 12 equal pieces. Place the slices, cut side down and barely touching each other, on top of the glaze in the pan. Cover, and let rise in a warm place until puffy and almost doubled in bulk, about 25 minutes. Preheat the oven to 375 degrees F. Bake the buns until golden brown on top, 25-30 minutes. Remove from the oven and cool in the pan to set the glaze, about 5 minutes. Invert onto a serving tray or another baking sheet and allow the glaze to dribble down the sides. Pull apart and serve warm.
CURRANT-PECAN FILLING FOR STICKY BUNS
1 1/2 cup packed brown sugar
1/2 cup butter, softened
1 1/2 tbsp ground cinnamon
1/2 cup dried currants
3/4 cup finely chopped pecans
combine all in a bowl and mix thoroughly. Reserve.
STICKY PECAN GLAZE FOR STICKY BUNS
1 cup butter, softened
1 3/4 cup [acked brown sugar
1/4 cup dark corn syrup
3/4 cup small pecan halves or coarsely chopped pecans
Saturday Night Food Lab
The last month or so this is how I've spent my Saturdays
AM: Go the YMCA
Noon or 3pm: Watch Michigan football, eat lunch
3-5pm: watch Food Network, specifically Throwdown with Bobby Flay, get dinner ideas
6pm: Go to Meijer, buy what I need to make my crazy Food Network recipe
7pm-12am: Make some crazy meal
So I have decided to call it Saturday Night Food Lab, since Lauren and I generally try to make something we've never made before. This coming Saturday should be really interesting, because boneless skinless chicken is on sale at Meijer this week ($1.99/lb!!). My preliminary guess is something like chicken cordon bleu or some other chicken dish that requires flattening chicken with a meat hammer.
But before that happens I need to share the disaster of this past Saturday night. Saturday afternoon Lauren and I watched Throwdown with Bobby Flay. In this episode he had a sticky bun battle with Joanne Chang of Boston. We thought that might be a nice thing to have either as a late night snack or for nice, easy breakfast. The sticky buns have to rise and proof for a total of about 5-7 hours, so it was best to get started early.
The recipe is not hard. Warm milk, flour, eggs, butter, vanilla, sugar, salt and yeast. Oh how I hate yeast. So we make these sticky buns about 7pm Saturday night and the first step is to add yeast and sugar to warm milk, then let it sit for 5 minutes until it gets foamy. "Foamy" isn't exactly a scientific measurement. So we stare at it, see some bubbles around the edge and a think skin on top and wonder if that is considered "foamy". We let it sit for a few more minutes and doesn't get any foamier so we decide that is probably what they mean. After all its warm milk, sugar and yeast, what is there to screw up?
We do all the other steps, add the flour and let the dough hook go to work. We set it aside and check back in hour later to see if our dough ball has doubled. Maybe? I doubt it, but I don't have a set of those calipers doctors use to pinch your body fat during a physical, so I can't really be sure. When it comes to dough, I kind of have an out of sight, out of mind attitude. Using my eyeball to determine whether or not a dough ball has increased in size just doesn't work for me.
So we proceed with the 4 hour refrigerated proofing, assemble the "goo" and pastry, cut the sticky buns and let them rise in a finished state for another hour. At this point its after midnight and I can see the writing on the wall. Even if they're any bigger than they were an hour ago, they're still not big enough. We bake them anyways and about 1:15am we sit down to a nice treat of unleavened sticky buns. Basically brown sugar syrup covered hockey pucks.
Sunday we go through all of this again, using a different packet of yeast. This time the milk/yeast/sugar mixture seemed thicker, had slight yeast bubbles on top and had been thoroughly brought to temperature and remained at the recommended temperature for activating the yeast for a full 20 minutes or so. The dough ball never rose and is still sitting its bowl this morning.
This is the third time we've struck out making some kind of yeast dependent breakfast pastry. I hate yeast. It freaks me out every time I make beer because I have to use yeast and the instructions always say that the yeast will begin fermenting within 12-15 hours but if nothing has happened within 48 hours you have a problem. However I've never once had the yeast become active within the 12-15 hour early period. It almost always takes 36-48 hours, which basically become an awful 1-2 days of me wondering if I was careless and just wasted $40 worth of beer ingredients. But even so, I've not yet had a batch of beer go bad on me because of problem with yeast, and beer takes about 6 weeks and 18 hours longer than sticky buns.
I just don't get yeast, and that bothers me even more.

 Posts
Posts


